%)
A bent Alvis 12/50

If I'm ever lucky enough to reach the age of 85 then I suppose I wouldn't complain too much if I were just an inch or so out of true but the Alvis doors were beginning to annoy me.
The bottom edge of the driver's door stuck out by an inch and whilst the aluminium door skin was not very permanently attached it still meant that from the inside, daylight could be seen.

The passenger's side was every bit as bad and the lady navigator wouldn't go anywhere without a travel rug (or two).
Things came to a head one day when I closed the door rather firmly (OK, I slammed it because the hinges were worn) and rust fell onto the running board.
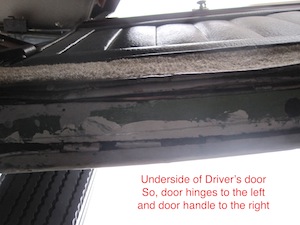
As you’ll see from later photos the aluminium door skin is attached to the door by crimping the skin round a mild steel strip which is screwed to the door frame. Over the years the steel strip had rusted completely through thus allowing the door skin to act as a vertical “spoiler”.
So, not only were the door frames warped but the door skins were barely attached to the door frames.
I had taken the Alvis to a coachbuilder last year but such was the sharp intake of breath that I thought I'd end up inside a whale.
Co-incidentally a friend of mine, who has a lovely collection of prewar oily rags and was also employed by Brighton's Royal Pavilion as a conservation expert, was seeking early retirement and it seemed only natural to ease him into retirement gently!
After the door hinges had been drilled out and new pins put in, off came the doors which were whisked away in Ray's only modern conveyance - an oily rag Morris Traveller with over 300k on the clock.


These photos of the driver’s door(left) and passenger’s door(right) taken in the back of the Traveller clearly shows the problem.
That old adage "it's not what you know, but who you know" is only partially right because although I take great pride in being an apprentice bodger, Ray's skills seemed founded on a lifetime of proper experience.

Pre-Op 1
This photo shows rather too well the delamination of the plywood of the inner door panels. The kicking strip/carpet which is laid along the base of the doors to a height of 4 inches has been folded back on itself at the top of the photo.

Pre-Op 2
This shows the drain hole in the bottom of the frame, which is a very sound door frame, but you can see the poor state of the mild steel metal strip which is screwed on to the frame and to which the aluminium door skin should attach.

Surgery 1

The patient on the operating table; the door is mounted in several clamps and vices with operating equipment laid out behind...and various dials which make it appear that the door is on a life-support system - I did say that Ray was very experienced!
Surgery 2
The first incisions - just looking at these photos and writing about it reminds me too much of my dentist.


Surgery 3
What do we do with this bit?
This has been cut off the base of the door; the thinner part of the piece of wood is the leading edge of the door frame.

Surgery 4
Transplant complete; and the piece of wood which was on the outside curvature of the door is now being clamped to the inside of the frame.
Result - the frame is the same thickness but now it’s the correct shape!

Surgery 5
...and now the equivalent of the dressings; small aluminium brackets have been made to attach to the door frame in place of the old rusty pieces of metal - their positions are adjustable.
Driver's side
Before


Passenger's side
Before

After

There is slightly more patina in the paintwork where a couple of old screws have pushed against the aluminium but unless I go to Specsavers that should be the least of my problems!
Comments